A lot of people are familiar with the Facebook retargeting ads where you target people who have visited your website with ads that will get them to buy a product or service, and therefore become a customer. What a lot of people don’t realize is that for eCommerce websites there’s a much better, more advanced way of doing this. Throughout this guide, I’m going to show you exactly how it’s done. By the end of this guide, you’ll have the tools to control what products your potential customers see and what products your current customers see. nude videos BDAY GIRL TS EEVEE You’ll also be able to show products that are tailored to their interests, whether or not they’ve been to your website at all. This process is very interesting and I’m sure you’ll get plenty of value from it.
What Are Retargeting Ads?
If you’ve visited an eCommerce website and looked at a specific product, you will likely see an ad for that same product when you visit your Facebook feed. If you added something to your cart at that same website and never completed the purchase, no doubt you will see an ad that exclaims, “Hey, don’t forget XXX … Finish your checkout.” There may even be a coupon attached to give you a discount to encourage said purchase.
These types of ads usually yield tons of Facebook conversions and there are case studies to back this statement up. These retargeting ads do require a bit of time to set up, but once you complete the entire process, these ads work for you in an automated way and will save you time and money in the long run, as well as garner you additional sales.
7 Steps to Advanced Retargeting
There are seven main steps to the process of re-targeting and all of them are important to successfully execute this strategic marketing tactic that will surely increase Facebook conversions.
You’ll start by creating your product catalog, then move on to setting up your product feed. Once that’s done, you’ll need to set up your custom audience pixel and plan your targeting strategy. This will lead to designing and planning your ads for maximum effectiveness. Finally, you will set up upsell and cross-sell campaigns and then your job will be to monitor and modify (as needed).
While this process seems a little lengthy—and a lot of these steps might not make sense yet—we’ll walk you through the process in more detail to get you started seeing more Facebook conversions on your store.
1. Creating a Product Catalog
Let’s start by going over the process of creating your product catalog. Creating and uploading your product catalog is really the heaviest lifting of this whole procedure.
Product catalogs work well for eCommerce enterprises, but can also be useful for different companies like car dealerships, hotels, travel agencies, and more. If you sell online or have a product that people are looking at online, a product catalog is a powerful tool to help convert those viewers into sales.
First things first, before creating a product catalog there are three main things you’ll have to make sure you have.
- Active Facebook Ad Account: This is very important. A lot of people don’t realize that a Facebook page is required to implement retargeting.
- Facebook Business Manager: This is another requirement. The Business Manager will have ownership over your ad account and page, making it easier for you to securely share access with others.
- Product: You need to make sure the products that you’re selling online are products that people are looking at online and you are able to convert on.
Facebook describes a catalog as a container that holds all of the items you want to promote on Facebook. After you create a catalog, you can use it with Facebook ad types, like dynamic ads or collection ads.
A product catalog in Facebook essentially operates the same way a print catalog would work. You can have multiple product catalogs per Business Manager and the catalogs can be organized based on how you want to present your actual products.
- To create a product catalog, you’ll need to go to the Business Settings in your Facebook Manager.

- Find Product Catalogs and click the button that says, “Add new product catalog.”


Then you will want to name your catalog and select the type of items that will be in your catalog. There are various options to choose from, such as products—which are eCommerce products that are sold online—as well as hotels and vacation properties, airline tickets, and destinations. What we’ll be focusing on in this article, however, will be eCommerce products.
Next, select your product catalog owner, which will be your business page. Now click on “Create” and you’ve got a shiny new product catalog.
2. Adding Your Product Feed
The next step is to actually add your products to the catalog. A list of the products you want to add is called the product feed. You can have a single feed to represent all of the items in your catalog, or you can actually have multiple feeds with each feed representing a different country that you want to sell products in, or a different category of products, depending on how you want to sub-rate them.
Products feeds are the actual items that are uploaded or fetched from your business to ensure that you have your product catalog up to date and in stock. You may have to make sure your products are current when you’re updating them, and you want to make sure your inventory is always up to date.
The first thing you’ll do when setting up a feed is to select your Product Catalog in Business Manager. You’ll see an option to add a product feed. Name your feed and choose the currency you use.

There are two options when adding/uploading your product feed. There is the auto-upload option, which is done with a URL. This is recommended because it will basically set your product feed up for automatic uploads if you make a change to a price, if something goes on sale, or if you change a description. Any changes you’re make within the URL will automatically be made in your Facebook product feed as well.
You can also upload your files manually. This is more time consuming and is not really recommended, but we want you to know that this is also an option. With a manual feed, you upload a file with the data. Any time you make a change to that data, you have to remember to re-upload or remove a file.
Why?
Sometimes products sell out and you’ll likely have price changes or sales. A lot of different things can happen when you have multiple products, so to ensure an up-to-date catalog (and less work on your part), using the first option is your best bet. However, should you want to do this manually, read on….
To create the file for your product feed, you’ll want to make sure you have the proper columns set up. Facebook is very, very, very picky about file format. Additionally, the columns must be written in English, even if the descriptions and currency are in another language. This is something to keep in mind. Here’s an image of the required columns for your items.

Each of these columns must be filled out for each item in your field, or in your feed. These are the different fields that you have to make sure you have the information on. This is a little bit tricky and very detailed, requiring a bit of heavy lifting, so to speak.
If you are an eCommerce company, you probably already have some sort of product feed or some sort of database where you have all of your products organized. In this case, you can essentially just copy and paste this information into your product feed.
Here’s an example of what it looks like.
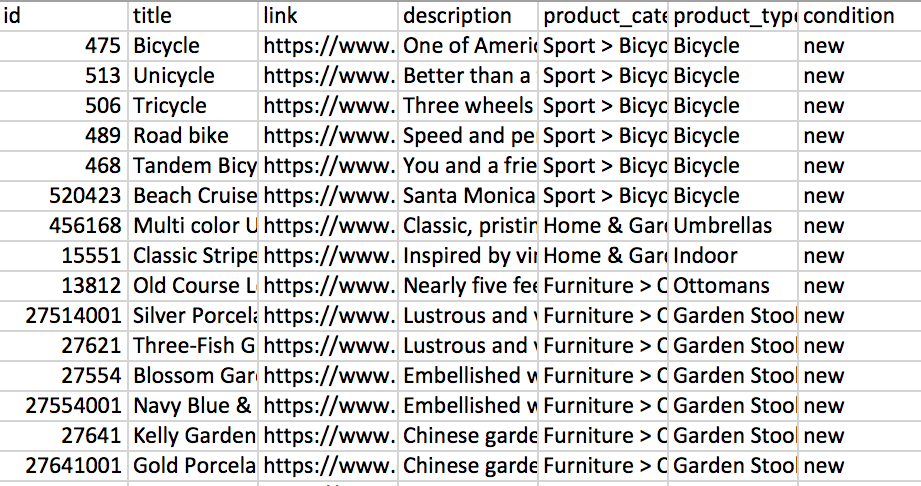
These columns on Facebook identify your product and will auto-fill the specific keywords into your dynamic ads (we’ll touch on dynamic ads later).
Now, onto product sets.
Product sets are defined by filters in a product catalog and are created at campaign setup. The minimum number of products in a set is 8 and the maximum number is 50. Usually, the higher number of products in your product set, the better your campaign should perform. Larger product sets also create a better experience for your users, as they’ll have more items to browse through. It’s usually recommended that you use the maximum number.
Making product sets is pretty easy since Facebook will automatically apply filters to your products using the names and identifiers from the columns in your product catalog. Your product sets will contain the products that you choose to advertise at the ad set level of your campaign.
3. Setting Up Your Custom Audience Pixel
A custom audience pixel is a variation of the original pixel that should already be installed on your site. If you’re already advertising with Facebook, you should be familiar with the whole process. If this is something new to you and you’re not comfortable with codes, I always recommend that you pass this task along to a website developer. This is where a lot of people will get confused. It is a little tricky and it’s not recommended to go in and mess with your code if you’re not an experienced developer.
If you don’t have a website developer and you’re doing this yourself, then you can always use the Facebook Pixel Helper which is a Chrome extension. This ensures that you’ve installed the code properly.
What you’ll do is start with a default Facebook pixel and make sure that it’s installed on every page of your website. This is done by copying and pasting your pixel code—which is provided by Facebook—into the header of your website. It should automatically add the base code to all of the pages on your website.
In addition to the base pixel, which tracks all of the traffic on all of your pages, you’ll want to add custom events to specific pages. These custom events will track the specific actions that are important to your business.
Dynamic ads require three Custom Data events to be added to your website. These custom events will need to be on your Product pages, Shopping cart pages or ‘Add to Cart’ buttons, and Purchase confirmation pages
This task will usually take you the longest because if you have a lot of product, this pixel will be different on each product page. You’ll want a custom event pixel on your shopping cart pages, or add-to-cart buttons, and you’ll also want a pixel on your purchase confirmation page. You can have a custom pixel on more than just these pages, but these are the minimum required custom event pixels. Facebook needs these for your dynamic ads to run properly.
In order to re-target customers at different stages of your purchase funnel, you have to modify your custom audience pixel to include parameters that will inform Facebook about the specific products that people are viewing.
Adding to their cart, purchasing, and viewing content. You can see the required parameters for each custom event in this image.

You have to add them exactly as they are. As I said before Facebook is very, very particular. Usually, if you’re not following these exact parameters, your ads won’t run properly and the pixel won’t fire properly, and this is the most important part.
Here’s an example of where the custom parameters come into play.

A content ID, or content group, reported from a Facebook pixel should be exactly the same as the corresponding ID column, or product group ID column, in your catalog. Most advertisers make the stock keeping unit (SKU) their content ID. This helps them keep track of everything.
Once your pixel’s implemented correctly, you’ll want to associate your pixel with your catalog. This is very important., as it makes sure your ads are automatically showing products based on customer behavior on different apps and websites.
For example, if someone is Googling pink tennis shoes, Facebook will be able to actually pull any inventory of your pink tennis shoes into your ad and then the shopper will see the ad, which features your pink tennis shoes, just because they were Googling pink tennis shoes. It’s a little creepy, but it’s effective.
4. Planning Your Targeting Strategy
Now we’re moving away from the spreadsheets and the codes into more of the fun part of driving more Facebook conversions. This is where all of your hard work actually pays off and you’re able to utilize the automation that Facebook offers.
Planning your campaign depends on what objective you want to achieve with your re-targeting ads. The possibilities are endless when it comes to choosing who you want to target, the campaigns you want to run, and the products you want to show off.
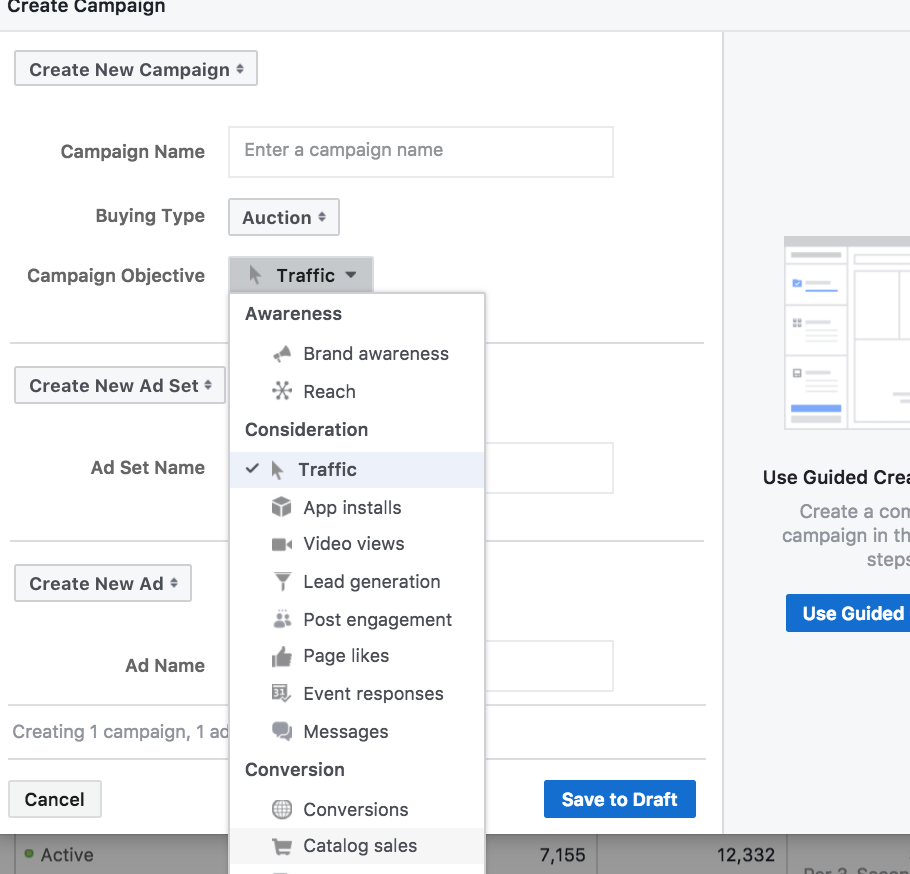
The first thing you’ll need to do is go into Facebook’s Power Editor and “Create a New Campaign.” (Dynamic ads aren’t currently available through Ads Manager, they’re only available through Power Editor. If you’re not comfortable with that platform, it’s recommended you get somebody on your team who is, or become more familiar before you dive in.)
When you’re creating new campaigns, you’ll select “Product Catalog Sales” as your objective, which is very important because this is the only way you’ll be able to use your product catalog. You’ll also be selecting the specific product catalog that you want to advertise in these campaigns.
At the Ad Set level, you’ll be able to create your budget and select your targeting criteria. The targeting criteria have many options. When it comes to the product sets you’ve selected, you’ll be able to select the targeting criteria that Facebook will use when it comes to showing your dynamic ads to your actual customers.
There are several different targeting criteria you can select from, such as:
- (Add to cart didn’t buy (specific products but then didn’t buy)
- Specific pages/ search terms but never added to cart
- Purchased in the last X number of days
- Went to site and never added to cart
You can even select a custom combination, such as targeting people who’ve added specific items to their cart and didn’t complete the purchase.
Facebook will then go show them an ad with that specific item on their Facebook feed. You can also target people who’ve viewed specific pages or searched for specific items on your site and Facebook will show them similar products.
For example, if they’ve searched for a yellow umbrella, they’ll see an ad with yellow umbrellas that are currently on your website. You can also target people who have purchased in the last four or five days, or you can even target—with a custom combination—”People who have purchased yellow umbrellas in the last 10 days also looked at green umbrellas, but didn’t purchase green umbrellas.” It’s really weird and very specific, but like I said, very effective.
Once your targeting is set up, you want to make sure your objective is set up according to what you want to achieve: Impressions, Conversion Events, or Link Clicks.

Conversion events are usually the recommended objective here because people with eCommerce websites want to drive more Facebook conversions. But you may also want to drive traffic, in which case you’ll either select link clicks or impressions.
If you are just starting out and don’t really have any customers yet, you may want to drive awareness. In this case, you’ll select impressions and you can run your awareness ads accordingly.
5. Designing and Planning Ads for Maximum Effectiveness
Still with me? We’re getting close to the end now.
Here we’ll address how to create your dynamic ad. A dynamic ad is what the user will actually see. The ad is where your product information will automatically populate when specific keywords are triggered. Basically, all of the work you’ve done thus far is for these dynamic ads to run smoothly and properly.
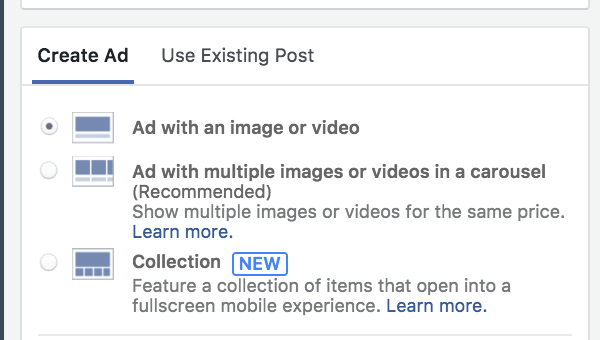
When choosing your ad format, you can decide between a multi-product dynamic ad or a single product dynamic ad. Dynamic product ads have the ability to either feature multiple products at once in a carousel format or a specific product in a single product ad that’s relevant to the customer themselves.
For example, if you want to cross-sell, you can show them multiple fitness shoes or whatever that they’re interested in. Say you’re trying to target a customer specifically because they didn’t complete a purchase for a specific shoe. You can show them the exact item that’s in their cart, using a single product ad.
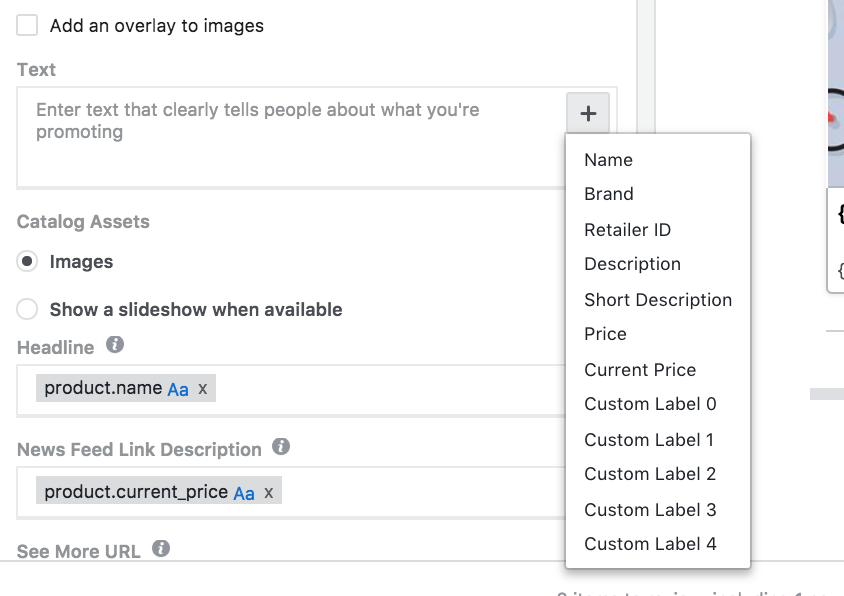
When you’re creating your dynamic ads, you’ll be filling out the same fields as you would with a regular ad. The only difference is that you’ll be mapping out specific keywords, such as product attributes, links to products, and images for Facebook to automatically pull.
Here’s an example of the drop-down menu that’s available when you’re creating your dynamic ad. The keywords will appear in the brackets, which is similar to Google AdWords if that’s something you’re familiar with.
Once everything is set up, you’ll be able to push your campaign live and monitor your results. Also, don’t forget to add your URL parameters. This is important for third-party tracking sites.
6. Set Up Upsell and Cross-Sell Campaigns
In addition to targeting people to increase the number of traditional Facebook conversions you generate, you can also create campaigns to cross-sell and upsell your current customers. With dynamic ads, you can automatically trigger upsell and cross-sell campaigns to people who have converted on your website.
These campaigns are an awesome way to increase the lifetime value of your customer base. It’ll show them relevant ads on their feed or in their audience network when they’re browsing through Google, based on their purchases or browsing behavior on your website. For your cross-sell campaigns, you can offer a complementary product or service based on someone’s browser history or purchase behavior.
For example, if someone viewed and purchased green t-shirts on your website, you can cross-sell complementary socks or shoes. Or say a visitor purchased an airline ticket for a vacation in Hawaii, you can cross-sell them hotels or car rentals.
Your upsell campaigns are more geared toward trying to sell people higher margin product or services based on their previous purchase behavior. For example, if someone was on your website and was looking at fitness shoes, you can upsell them fitness watches, or smart fitness watches, which are more expensive. That would be considered upselling.
7. Monitor and Modify Your Retargeting Ads
Monitoring your results is one of the most important aspects of this entire procedure. It’s the final step. (Yes, you’re almost done!)
You have to make sure that your ads are working in the way that you want them to be working. A lot of people will say, “Now that I made a dynamic ad and it’s live, I never have to look at my campaigns again.”
That’s not the case…ever. You want to use these dynamic ads and campaigns to your advantage. See what’s selling. See what’s not. See why people aren’t completing a purchase. Maybe you have a high volume of people that are adding things to their carts but never completing the purchase. Is there something you can do to push them to that final step? Seeing issues like this may even lead you to improve your products to drive more Facebook conversions.
A few tips on monitoring and modifying:
When you set up your Facebook pixel you want to make sure that it’s associated with your catalog so that your pixel fires match the items you’re advertising. There’s something called an Events Page in your Catalog Manager and you can see the overall match rates with items inside and outside your catalog using this Events Page.

Your Events Page gives you insights into your website’s pixel fires, specifically how many times people interact with your items. This includes items they viewed, items they’ve added to their cart or purchased, and whether or not these items were in your catalog at all.
In your Events Table, under View Samples, you can find a detailed timeline of interactions with your items in your catalog over a 28-day period. You can see the date, product ID, and the number of people that interacted with your products. You can also see if this product is actually in your catalog or not.
The match rate is another cool data point that will tell you the number of products on your site. Basically, the match rate is calculated by the number of products on your site that are in your catalog, plus the number of products interacted with on your website that were found in your catalog, divided by the total number of products that were interacted with on your website as a whole. This number is very valuable.
You want to make sure that you have a consistent match rate. If your match rate is low, this means that you don’t have all of your website products in your product catalog, hence your ads aren’t performing as optimally as they could be. Or it could be that your catalog isn’t formatted properly, which could reflect a low match rate. You would want to remedy that immediately.
Again, utilize your audience insights to troubleshoot performance. Make sure you have a 100% match rate. Tweak your strategy. Find out what works best for you. Find out what doesn’t. What drives Facebook conversions will vary for each business.
Dynamic ads, which have been available with Google AdWords for a while, were introduced on Facebook in 2015. So this is a newer platform and Facebook is always changing it and improving on it. It was originally just available for people with Facebook API. Now it’s available through Facebook Power Editor, which is cool because now it’s available to anyone with an eCommerce store.
Final Thoughts
If you’re able to get through the heavy lifting and all those initial steps—organizing your products, uploading them, making sure you have a product feed that’s being uploaded dynamically, making sure all of your products’ feeds are up to date and reflect your actual product on your website—these ads usually show amazing results. They’re hyper-personalized and people love that.
Welcome to your optimized eCommerce Facebook Ads strategy and more Facebook conversions!